Types of egg painting. Types of Easter egg painting
Pysanka, krapanki, krashanki are eggs painted for Easter in various ways. Modern housewives usually simply boil eggs in food coloring and use special films with patterns; when boiling water gets on them, they tightly envelop the egg. In this article we will look at the ancient traditions of painting Easter eggs with our own hands; a master class on painting wooden blanks using paints is attached.
Drawing with wax
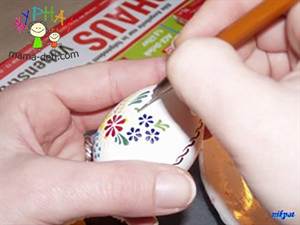
To start painting eggs with hot wax, you need to prepare materials and tools, and also come up with a pattern design. Basically, pysanky are raw eggs painted with lines and abstract patterns. Sometimes the contents of the egg are blown out of the holes.

So, for work we will need eggs, wax or paraffin candles, napkins, food coloring, pre-diluted in water, and a writing tool, which is sold in craft stores. It is a metal funnel with a handle.
Wax is placed into this funnel and heated over a candle fire. Actually, this is how we will apply the pattern with wax from this watering can.


The eggs need to be washed, dried and the surface wiped with alcohol; each time we warm up the watering can, because the wax tends to cool quickly.
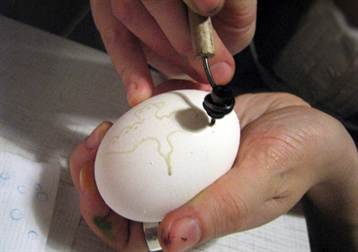
After drawing the main lines, lower the egg into one of the colors, take it out after a couple of minutes and continue applying additional patterns. And we dip it into the paint again, but in a different color.

In order for the drawing to appear now, you need to hold the egg over the candle flame and wipe it with a napkin.
Another way to color eggs for Easter is with colored wax crayons. You can buy them at a stationery store. The crayons are melted in metal containers and multi-colored pictures are applied with an inverted needle or other stick.
Continuous lines are unlikely to be obtained, but it is quite possible to make petals and spikelets with dot painting.


If you are using empty eggs, thin satin ribbons can be threaded through the holes at the bottom and top so they can be hung or folded into pretty bows. Although in reality Easter eggs can be boiled, painted and then painted.
Easter souvenirs
Coloring eggs is an interesting creative activity for children, both in kindergarten, and at home. For beginning artists, you can paint with gouache paints, and first empty the eggs. To do this, make a hole in the upper and lower parts with an awl and blow out the contents; if desired, the holes can be sealed with a small piece of masking tape or covered with dough. Or if you have a medical syringe, use it to remove the contents. You can apply a design to the eggs.
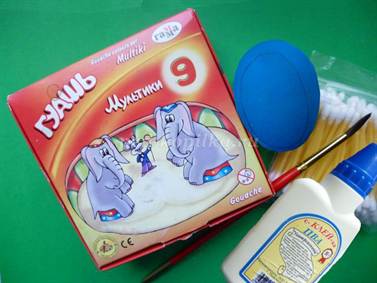
To work with drawings, you can connect markers and felt-tip pens for contouring.


Experienced craftsmen also paint wooden eggs; they use acrylic paints to create original souvenir eggs that can be given to loved ones or sold.
Let us consider the painting technique in detail using the example of one of the works.
Step 1. Prepare materials and tools.
We will need - a wooden egg, sandpaper, acrylic paints (you can also paint with gouache), brushes, preferably synthetic, for working with acrylic. The rest is as needed - napkins, pencils and protective newspapers, decoupage varnish.

Step 2. Preparing the workpiece for work consists of sanding the wooden surface with sandpaper. Typically, before painting, wooden surfaces should be coated with either an acrylic primer or a homemade solution of PVA glue and water in equal parts and cleaned. Maybe instead sandpaper Use a construction sanding sponge.


Step 3. Apply the first layer of paint with a wide brush over the entire surface and let it dry, make a sketch with a pencil and apply the details of the drawing with thin brushes, as shown in the photo.


Ideas for painting
Eggs in traditional folk painting made in several layers. To paint berries, flowers and birds in the style of Gorodets painting, first apply the background, then draw the first layers of the spot, which determine the positions of the main details, while making the tone lighter. With the second layer we draw the dark details with thin strokes that create the shape of flowers or leaves. And at the end the highlights are drawn with white and yellow paints. At the end of the work they are varnished.
====================================================
Symbols Easter table In addition to the traditional Easter cake, there are, of course, eggs painted for the holiday. You can decorate Easter eggs in an original way using simple painting techniques that are accessible not only to adults, but also to children. We are happy to share the secrets of our craft with our readers.

In order to paint Easter eggs, it is not at all necessary to be a master of a brush. In addition to traditional painting with an artistic brush, there are simpler techniques, some of which do not require this tool at all. Let's look at the most popular of them.

Bonded painting
To paint Easter eggs using this technique you will need:
- cotton swabs (pokes);
- acrylic paints;
- brushes;
- sponge;
- cotton pads;
- sunflower oil or furniture varnish.

Progress:
1. Boil an egg hard-boiled, dry and cool it. If you want to make a real Easter souvenir, carefully remove the contents of the raw egg through small holes in the bottom and top and paint the dried shell.
2. Using a foam sponge, cover the entire surface of the egg with white acrylic paint. Dry for a few minutes. If the coating is not thick enough, apply another layer.
3. Start painting the Easter egg. We suggest you decorate the shell with bunches of rowan berries. Dip a poke (cotton swab) into red paint and, applying it with perpendicular movements to the shell, draw 10-15 large berries forming a bunch.
4. The second element of our Easter egg painting will be rowan leaves. First, using a cotton swab, draw lines with green paint - the bases of the leaves. To enliven the painting, apply a more saturated color stroke with a thin brush to each green line.
5. Yellow strokes made on the leaves with a thin brush will further enliven the painting and make it more voluminous.
6. Draw highlights on the berries and leaves by applying a few white strokes using a brush or cotton swab.
7. To create contrast, add a few black dots to the base of the berries.
8. After the painting on the Easter egg has dried, coat it with furniture varnish. A boiled egg can be treated with vegetable oil using a cotton pad to make it shine.

Easter egg painting with wax
Easter eggs painted with wax are called pysanky. This technique is traditionally popular in Ukraine and allows you to create both simple souvenirs and genuine artistic masterpieces.
To paint eggs using wax technique you will need:
- a raw egg;
- pisachok - a device for applying hot wax to the shell. You can make your own pisachok by twisting a small piece of foil into a funnel and securing it to a wooden stick. Wax is placed in foil, heated over a flame to a liquid state and applied to the shell through a hole in the funnel;
- candle;
- vinegar;
- cotton pads.
Progress:
1. From a raw egg at room temperature (not cold!) Remove the contents through small holes at the bottom and top. Wipe the shell with a cotton pad soaked in vinegar.
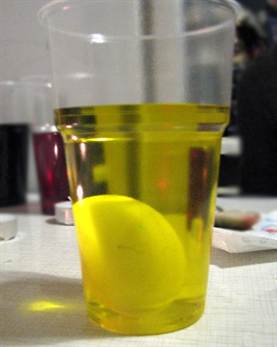
2. Prepare egg dye - it can be natural or artificial dye.
4. Immerse the scribbler in the melted wax and heat the contents of the funnel over the flame again.
5. Apply the wax design by rotating the egg, but without moving the scribbler.
6. After the wax has hardened, dip the egg into the dye and let the paint dry.
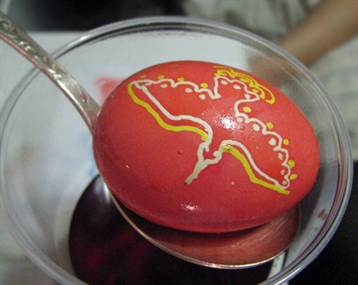
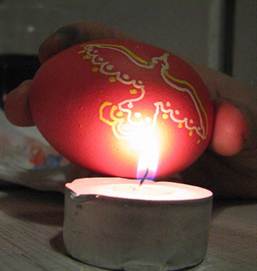
7. While heating the wax painting over a candle flame, gradually remove the wax trace from the surface of the shell with a woolen cloth. The areas where the wax was applied will remain unpainted, and you will have a light design on a colored background.

Working with a pissy

The traditional color of Easter eggs is red


The Easter egg is a model of the world, so eggs are often painted with belts
(sky, earth and underworld) and draw animals and plants on them

The painting features birds, flowers and patterns with waves.

Variety of colors and styles

This is what the Lusatian wax painting of Easter eggs looks like
Easter egg painting with engraving
Easter eggs painted using this original technique are called “shkryabanks”. To create a painting-engraving you will need:
- chicken, duck or ostrich egg, cleared of contents;
- a sharp and thin tool for engraving, for example, a stationery knife;
- paint for Easter eggs.
Progress:
1. Dye the eggs in your chosen color using natural or artificial dye.
2. Dry the shell for 24 hours so that the dye hardens well.
3. Using a sharp tool, “scrape” out the eggshells selected ornament (you can use a stencil).


Modern scrap banks

Even a simple scraper can be performed masterfully
Ornaments for painting eggs
Browse our selection of Easter egg designs to see if one of them will inspire you to experiment.

A simple pattern for stanchion painting and painting with a traditional solstice

Traditional painting

Ornament "Intercessor"


By the way, you can decorate not only ordinary chicken eggs, but also wooden models - they definitely won’t crack, and especially beautiful drawing can be stored for years.
If your family has a tradition of exchanging Easter gifts, make beaded Easter eggs.


VERY BEAUTIFUL EASTER EGGS CAN BE OBTAINED BY USING HOT WAX PAINTING. THE DEFINITION OF HOT WAX MEANS ORDINARY WAX CRAYONS THAT CAN BE PURCHASED IN A STATIONERY STORE. TO PAINT EASTER EGGS, WAX CRAYONS (CAN BE REPLACED WITH BEESWAX OR PARAFFIN CANDLES TINTED WITH FOOD COLORING) ARE MELT, PLACED IN A SMALL METAL CONTAINER, WHICH IS HEATED TO A TEMPERATURE OF 65 °C. WAX PAINTING IS MAINLY USED FOR ALREADY PRE-PAINTED EGGS, WHICH LOOKS MORE AND VERY EFFECTIVE.
 |
Before you start painting the Easter egg, you need to paint it in any traditional way known to you, of which there are quite a lot. Eggs are colored in onion skins, food coloring, beets, and so on. In order for the egg to color well and evenly, it must first be washed well and degreased. Vinegar is usually used for degreasing; eggs are wiped with a piece of gauze or a cloth soaked in vinegar - using the food coloring method. When coloring with a decoction of onion peels, you can add vinegar while boiling eggs - 1-2 tablespoons of vinegar and a pinch of salt per liter of water.
Copper wire is used to paint Easter eggs with wax (in the absence of copper wire, you can use a long needle, crochet hook, or awl). You can take a round wooden stick and insert a copper wire into it, leaving a copper tip about 2 cm long. The thinner the tip, the finer lines you can draw on the egg. For painting with hot wax, it is copper that is used, since due to its properties it retains temperature for a long time, wax on copper wire does not harden quickly and you can draw quite long lines.

Work process
Wax or wax crayons (you can also use ordinary colorless paraffin candles) are melted in a small metal container (you can take a tablespoon) over a flame (over a burning candle, burner or in a water bath on the stove), heated to a temperature of 65 ° C (do not bring until the wax boils), we maintain the temperature of a certain color of wax throughout the painting.
Use a copper tip to attach a small amount of wax and paint the egg by placing dots or drawing lines. The combination of lines and dots makes it possible to create a variety of patterns.


The egg, chicken or goose, during painting must be at least room temperature, not cold!, since our wax is hot and can harden immediately after it hits the egg. As for the wax, it should not be too hot or cold during painting. To achieve a satisfactory result, use one egg for testing to understand what wax temperature is best for painting with a particular pattern. If you want to paint an egg with different colors of wax, then do not paint it with all the colors of the rainbow at once. First paint the entire egg with one color, then wipe the egg with a dry cloth, which will remove any excess wax, if any. Then you can move on to using a different color of wax.


Upon completion of painting with hot wax, for a better effect, Easter eggs are greased or sunflower oil, which gives them shine.
To paint an Easter egg, you can use the templates below, or you can come up with something of your own. Experiment and you will succeed! See also Templates for painting Easter eggs.


If everything described above is not entirely clear, I suggest watching this video clip in which a Czech craftswoman paints an Easter egg with hot wax. Video clip without comments, which are not needed at all. The main thing is to see it once and everything will immediately become clear)

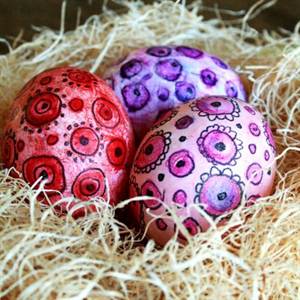
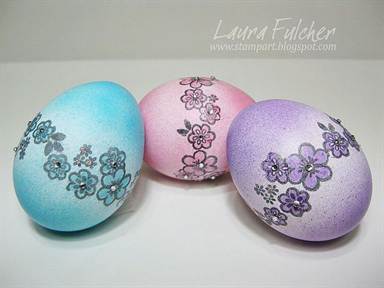
And now I propose to look through beautiful ideas for painting Easter eggs that can inspire creativity, handmade for Easter.
See also Easter egg decor with sweet roses.


Why are eggs painted for Easter?
1:581One of the explanations, quite logical and practical, interprets it like this:- during the 40-day fast, when eggs cannot be eaten, the chickens did not stop laying eggs, and the owners boiled the eggs so that they would not spoil. Boiled eggs were colored so that they could be more easily distinguished from fresh ones.
1:1085 1:1095
2:9
Another, more poetic version of why eggs are colored tells the following story:. The first Easter egg was presented by Mary Magdalene to Emperor Tiberius. After the miraculous resurrection of Jesus Christ, she came to the Roman emperor with the words: “Christ is Risen!” In those days it was impossible to come empty-handed, so she brought him an egg as a gift. However, Tiberius did not believe her words, objecting that no one can be resurrected, just as a white egg cannot turn red. As soon as the last word left his lips, the egg really took on a scarlet color.
2:1059 2:1069Since then, the tradition of painting eggs has emerged.
2:1154 2:1164Originally the color was only red, symbolizing the blood of Christ, while the egg itself was a symbol of rebirth. However, later they began to be painted in other colors and chicken eggs were replaced with wooden, chocolate or made of precious metals and stones.
2:16622:9

What types of egg painting are there?
There are a few different ways Easter egg painting. Each type of Easter egg painting has its own name.
3:811 3:821Easter eggs
- These are eggs painted with beeswax and paints that are given to each other for Easter.
3:1018 3:1028Pysanky is one of the most difficult ways to color eggs. Patterns are drawn on a raw, cold egg using hot wax using a steel feather. Having made a pattern, the egg is dipped into diluted cold paint, starting with the lightest one, wiped and a new pattern is made with wax and again dipped in another paint. When all the patterns have been drawn, you need to carefully “stop” the wax from the egg over the flame of a gas burner or over a candle. As the wax melts, it should be wiped off with a soft piece of paper or cloth.
3:19283:13


Krashenka
- a hard-boiled egg, painted one color without patterns.
7:673 7:683Basically, paints are made for Easter, and games are also played with them. Among the Slavs, rolling paints on the first grass is a magical action, calling mother earth to fertility.
7:1016Krashenki - from the word paint. You can color eggs in different ways.
Some housewives boil eggs hard and then immerse them in a solution of warm water for 10-15 minutes. with food coloring, which can be bought in the store.
Other housewives love to paint eggs in a decoction of onion peels. To do this, place raw eggs in a saucepan with water, add onion peels and cook for 15-20 minutes until the eggs acquire the desired color.
Previously, eggs were painted in a special way:
7:78they were wrapped in dry leaves of oak, birch, and nettle, tied with thread and boiled. The result was beautiful “marbled” eggs.
7:317 7:327


Krapanka
- an egg with a plain background on which spots, stripes, and specks are applied with hot wax.
11:724 11:734Ancient specks could be based on no more than three color combinations.
11:871Krapanki - from the Ukrainian word “to drip”, that is, to cover with drops. First, the egg is painted with one color, then, when it dries and cools, drops of hot wax are applied to it. Once the wax has cooled, the egg is placed in a solution of a different color. After the paint has dried, the egg is dipped into hot water. The wax melts and a very funny egg comes out. The wax can be carefully scraped off.
11:157111:9


Rubbish (shkrabanka)
- a monochromatic egg on which the pattern is scratched with a metal tip.
15:739 15:749Usually, scrap jars are painted with natural dyes, since food dyes smear very much when scratched.
15:973For drape, it is better to take brown eggs. The shell of such eggs is stronger than that of white eggs.
15:1154 15:1164First, the eggs are boiled, then painted some darker color, and then dried. The pattern is applied to the shell with a sharp object - a knife, an awl, scissors, a thick needle, a stationery knife. But before scratching the pattern, it must be applied to the egg with a sharp pencil.
15:165215:9
During operation, the egg is held in the left hand, and a sharp object in the right. The openwork pattern on the drape looks good on brown or other dark paint.
15:303The design on the drapanka can be anything, unlike the pysanka, with its strictly traditional geometric patterns.
15:516 15:526Using the edge of a stationery knife, scratch the contours of the design. To create shades inside the contours, we draw the pattern not with the tip, but with the entire surface of the knife blade. Erase the pencil sketch with an eraser. The drawing is ready. For shine, you can wipe the egg with a cotton swab and a drop of oil.
15:1034 15:1044


Malevanka
- an egg painted with an invented pattern.
18:1159 18:1169They have no symbolic meaning and can be painted with paint (not wax). In addition to patterns, the paintings often contain plot pictures and landscapes.
18:1455 18:1465


Eggs
- eggs carved from wood and stone, made from porcelain and clay, were made in Rus' back in the 13th century.
23:751 23:761Later, eggs began to be decorated with beads, lace, knitting, etc. The most famous “eggs” in the world were made by the imperial jeweler Carl Faberge.
23:1040 23:1050


Now I will introduce you to a list of natural egg dyes that allow you to achieve different colors and shades.
30:225 30:2371. Yellow-brown “Onion”
30:318This method of coloring eggs using improvised means is perhaps the most common. To use it in practice you will need to get peel from at least 10 onions(for coloring a dozen eggs).
30:709Many vegetable departments in stores come to help housewives in finding the “cherished ingredient” on Easter Eve, offering to purchase peels packaged in small plastic bags.
30:1077- Chop the onion “clothes” you have stored and fill them with a liter of water.
- The resulting mixture should be boiled for 30-40 minutes, after which the colored boiling water must be strained to remove the husks.
- Immerse the boiled eggs in the boiling strained mixture and cook them for about 5-7 minutes. The time will depend on what color you want to achieve.
2. Red, festive
30:58To give eggs a particularly elegant red hue, you will need ordinary beets. Grate the root vegetable on a fine grater. You don’t have to cook anything: just squeeze the juice out of the resulting pulp and keep the boiled eggs in it.
30:479 30:4913. Yellow, sunny
Boiled turmeric (saffron) will help you in just a few minutes to color the shell of the main symbol of Easter a cheerful yellow color. Prepare a decoction of this oriental seasoning, strain it and cook the eggs in the remaining water for 5-8 minutes.
30:999 30:10114. Green means life
30:1083To give boiled eggs a life-affirming green hue, you will need a solution of brilliant green familiar to everyone from childhood.
30:1343The excellent coloring properties of brilliant green hardly require additional advertising. Dilute the required amount of the drug in boiled, but not boiling (40-50°C) water and place boiled eggs there for a few minutes.
30:1751 30:115. Sky blue
30:57Surprisingly, the blue tint of eggshells has been given to eggshells since ancient times using red cabbage. Place finely shredded cabbage in an enamel or glass bowl. Pour a mixture of water and vinegar over the improvised “salad” (2 tablespoons per 200 grams of water), let the resulting mixture sit for 5-8 minutes and strain. Place already boiled eggs in the resulting liquid and hold until the desired shade is achieved.
30:835 30:8456. Purple or orange
30:912These colors can be obtained by mixing red dye with blue or yellow.
30:1071 30:1081Now you know how environmentally friendly and completely harmless natural dyes can help color Easter eggs. Take care of your health and enjoy the pre-holiday activities with your family.
30:1468 30:1480