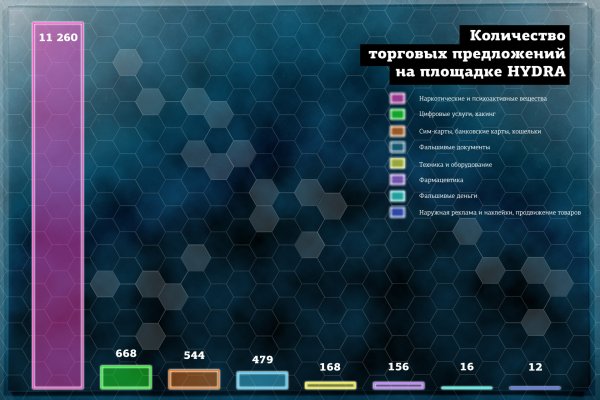
Thermal transfer paper for inkjet printers. How to make a print on a T-shirt: step by step instructions, necessary materials, tips, photos Thermal printing at home

Modern fashion trends are increasingly conducive to bright multi-colored patterns, bold decisions in clothing. The choice of individual colors and original design in a personal wardrobe is beautiful way self-expression and a kind of message to others about the essence of his personality. Ready-to-wear is not to everyone's taste, although there is now an incredibly rich and varied selection of various clothing items. Many people prefer to personalize their own look with their own hands, decorating and altering ready-made clothes according to their tastes and preferences. In most cases, this applies to light T-shirts and T-shirts that can be decorated with original prints. Moreover, this can be done not only in specialized firms, but also at home with your own hands. Consider how to make a print on a T-shirt with your own hands.

Paint selection

In order to make a quality print on clothes, it would be better to use acrylic-based indelible dyes. They have very bright and saturated shades, are very easy to use and are incredibly resistant to fading. Skillful combination when applying an aerosol print acrylic paint, water-based spray paints, as well as liners for drawing the contours of the picture will allow you to create an exceptional product with a beautiful image of a fashionable design or an original inscription on a T-shirt.

A creative approach to decorating a simple plain t-shirt will make you the owner of a unique piece. We offer lovers of creativity and people with a well-developed imagination to make an interesting pattern on a T-shirt. So, how to make a high-quality print on a T-shirt?

Drawing on a T-shirt at home

Even without special skills, with the help of special tools you can give clothes a unique style and a bright personality. Consider two ways to apply a pattern to a fabric - using a stencil and using nodular technique. They can be used not only separately, but also in close combination with each other. For dyeing, a T-shirt is taken from natural material - cotton, silk, linen, or the product should contain no more than 20% synthetics. If the T-shirt is new, it should be washed before dyeing to remove softening additives.

Necessary tools

To create a unique attire, you will need a few improvised means. You will need these auxiliary materials:


Knot staining technique

How to make a print on a T-shirt at home using knot technique? Step-by-step instructions involve the implementation of several phased actions:


As you can see, it is quite easy to make a print on a T-shirt yourself using the knot technique. In addition, such a procedure is quite accessible to everyone at home. But it should be remembered that such a T-shirt can only be washed by hand in water at a temperature of no more than 30 degrees, after turning the product inside out.

With thermal transfer paper

Printing on a T-shirt with thermal transfer paper is even easier. This technique is quite convenient to use, and the result will undoubtedly please the owner of an exclusive thing, decorated by him with his own hand.

To create a print, you need to prepare:

  • T-shirt (white)
  • thermal transfer paper;
  • iron.

First, decide what kind of print you want. Before you print a picture, turn it in the mirror direction. This is done so that as a result, when applied to the fabric, you get not a mirror image, but the correct display. This rule is especially important if your image has text captions.

Lay the T-shirt out on the ironing board. flatten the fabric. Take paper with a pattern printed on it. Next, cut out the image along the contour.

Then lay the paper on the fabric pattern side down. Next, turn on the iron, choosing the highest power. Then iron the paper for four to five minutes.

After that, leave the product for seven minutes to cool down. Remove the paper, it is no longer needed. Remove it carefully so that the image on the surface of the thing is not damaged.

Of course, over time, such a print will lose its presentable appearance. But sooner or later it happens to everything.

Stencil staining technique

Now let's try to master another simple technique. Next, we will tell you how to make a print on a T-shirt using a stencil.


Selection of a pattern for print

When wondering what kind of print can be made on a T-shirt, it should be noted that the pattern should not be very technically complicated. Otherwise, it will be extremely difficult to cut a good stencil and make a clear painting of the details. It should be more of a schematic drawing than a work of art. And here your imagination will come to your aid.

Let's end with some helpful tips when applying prints on clothes:


Conclusion

So, making a print on a T-shirt at home is not difficult. You will be free to experiment with your wardrobe, giving your clothes an elegant look and realizing your creative thoughts and ideas. Having trained on simple T-shirts, you can also transform boring clothes, giving them a second life and enriching your wardrobe with new extravagant accessories.

There are several ways to apply images to fabric. Not all of these methods can be repeated at home, because. they require special equipment. Screen printing or silk screen printing, sublimation, thermal transfer or digital printing. The last type of printing will suit you.

What You May Need

To print a photo on a T-shirt at home, you will need the following materials: a 100% cotton T-shirt, preferably light or white, a digital version of the photo, an inkjet (this is very important!) Printer, thermal transfer paper, an iron and scissors.

Transfer paper can be purchased from computer stores and office equipment stores selling related products.

A white 100% cotton T-shirt is needed because synthetics may not withstand high temperatures during photo translation, but White color fabric will hide the white paper background. However, if you can find colored thermal paper and a T-shirt to match it, you can use it.

Work process

Select the image you want. You can make a collage or caricature in a photo editor. Then display the photo in mirror image and save. This is especially important if your drawing has inscriptions.

Insert thermal paper into the printer and print a photo. Let it dry for about an hour. Trim off any excess around the edges of the photo. If the image is square or rectangular, then cut straight along the edge, departing from the pattern by 5 mm. And if the drawing does not have clear contours, then simply round off the borders and make the lines smoother.

Lay the printed image face down on the T-shirt. Heat the iron to high and iron the paper for 3-5 minutes. Gradually increase the pressure on the paper. Pay special attention to the edges of the image. Wait for the thermal paper to cool before gently removing it from the T-shirt. To do this, gently grab the corner of the paper and pull. Do not make sudden movements, sudden jerks. If you see that the paint does not all remain on the fabric, but stretches from the paper, put the film back and iron it well again.

It is believed that such T-shirts should easily withstand up to 50 washes before the pattern is erased. Practice shows that you can definitely afford without fear and risk of 20 washes, and then - how lucky.

Thermal printing - pictures on fabric

To make your own fabric pictures or ready-made clothes at home, you need (transfer paper). It happens for light and dark things, and the methods of thermal printing are different, but the principle is the same: the image you choose is printed on this paper using a conventional printer. Then the pattern is transferred to the fabric - with an iron. Such printing on fabric convenient for small decorative works that do not have an industrial scale. The process is quite expensive, but the result justifies itself: at the end you get a thing with your exclusive image or photo.

So we bought paper for drawing pictures on fabric(transfer paper - for bright cloth), for example, Lomond. This paper is an ordinary sheet, on one side of which a marking grid is applied, and on the other, a special layer similar in composition to polyethylene (at least on fabric it will look like this - a waterproof film). On this layer (this side of the paper) you need to print the prepared image or photo. Paper for bright things has a transparent film and the print is applied in a reflected state: i.e. you need to print the picture back and forth (for example, if there is an inscription, all letters on paper should be printed backwards). See instructions on paper.

We are preparing a fabric or thing on which the picture will be transferred.


We cut out the picture, leaving a minimum at the edges and put it on the fabric with the "face". It is easy to guess that the future picture will be turned to us by the right side (but for now - under the paper).


We iron the picture with an iron in accordance with the instructions on the package.


Let's linger over all areas of the print of the hottest part of the iron - the central one. In this case, the "polyethylene layer" under the paper melts and firmly sticks to the fabric along with the pattern.


If you want to make several prints on one area, go to the next picture without removing the protective paper layer. If the iron accidentally hits the first print, it won't hurt it.


Then we move on to the next part...

And so on until everything you need is smoothed into place.


This begs the question, isn't it more convenient to translate all the prints in a single sheet? thermal print- this is a kind of plastic substance that does not pass air and moisture particularly well and reduces the extensibility of knitwear. If you make a large "sheet", it will not be very comfortable in it. Therefore, if possible, it is better to smooth each small detail separately, leaving more "air", and cut out the details with a small allowance (~ 2 mm): it will be transparent. Another reason in favor of small elements is that they are easier to heat with "one iron".

At the end of the thermal transfer, we give some time to cool. And then, with a deft movement of the hand, we remove the paper from the prints.

Well-ironed paper comes off easily (if not, you may have underexposed the picture under the iron).

It can be difficult at first to pry the end of the paper so that the film remains on the fabric, but after the edge is found, the paper comes off easily.

When the paper layer is removed, open prints cannot be ironed - they will melt and stick to the iron. This must be taken into account when further ironing the product. For protection, you can use tracing paper or other paper.

You can wash products with such prints. If you used "native" printer cartridges, the ink will not flow or fade.

Prints on fabric sensitive to wrinkling and friction - on products with increased wear, the print may crack and peel off over time. Consider this if you want to use the product for a long time. The way out in this situation may be to apply a print on a flap of fabric and create patches, which can later be removed or replaced.

Pictures transferred to fabric, look slightly paler than the original, this should be taken into account when preparing the image.

What do an asocial punk rocker and a grandmother who loves needlework have in common? Both of them can get into making thermal drawings! With thermal stickers, you can easily decorate t-shirts and other products with images that you create yourself by printing a file from your computer and creating a truly unique, new element. All you need is a fabric item, a design, thermal transfer paper and an iron!

Steps

Part 1

Preparing to Transfer an Image

    Buy thermal stickers in the store. The easiest way to print on clothes is to simply buy a ready-made set with iron-on from an art supply store, art supply store, or large outlets. retail. Some kits have everything you need, including tools and a t-shirt. You can also make your own prints based on selected materials.

    • In a nutshell, thermal stickers are designs that can be transferred onto fabric. On one side is paper, and on the other is an image that will be transferred to the fabric. The thermal sticker is placed on the fabric, heated with an iron on the reverse side, after which the pattern is transferred to the fabric.
  1. Create your own drawing. Find or draw a blank that you want to transfer to a thing. You can search for a picture on a computer, on the Internet, or create it using special programs. For example, you can scan your child's drawing, save it to your computer, print it on transfer paper, and print it on a T-shirt. Or you can use applications such as Photoshop to create a new and unique design yourself, print it on transfer paper and transfer the image to another type of fabric.

    Modify the image. Use elementary programs to edit the image, reduce its size, add effects, choose a color, or make any adjustments you want to achieve the desired result. Images can be taken from one of the many Internet sites dedicated to iron-on transfers or you can create your own. If you have the ability to print the selected print on your home printer (and the right to use this image), you can transfer it to the fabric.

    See how the mirror image will look like. This is especially important for light fabrics. Check that the drawing is displayed correctly. So it will remain the same after the transfer. This is especially important if your drawing contains text. On the screen or on thermal paper, the letters must be unfolded in reverse direction. If you do not make a mirror copy of the pattern, then after transferring it to the fabric, it will be turned in the opposite direction.

    • To mirror an image on a computer, you can use the "reverse view", "flip image horizontally" or "mirror" options in your program. See the Help section of the program you are using for more information.
  2. Use the correct type of thermal transfer paper. There are two different types of thermal transfer paper: for light and for dark fabrics. Different types of thermal transfer paper are suitable for different tones of the T-shirt. For example:

    ADVICE OF THE SPECIALIST

    Designer and stylist Oh Joy!

    Find a T-shirt made from a material suitable for applying the iron-on. Some fabrics hold heat-on stickers better than others. It is usually better to use cotton rather than polyester.

    Transfer the thermographic. Be sure to print a preview copy of the image on plain paper before printing on thermal paper (which is often expensive). Do this to make sure the colors are displayed correctly and that the margins of the image are within the printable area, and also to see what size the finished drawing will be (sometimes the display on the screen can be deceiving).

    Part 2

    Transferring a picture
    1. Lay out the fabric. Lay the T-shirt or fabric on a hard, flat surface and iron out any wrinkles. Working surface should be resistant to heat and large enough to overlay the pattern completely.

      Cut out the pattern along the outlines. Cut out the pattern along the outlines to better see its location on the fabric. Trim the outlines as close to the edges of the image as possible.

      Protect the product when transferring the pattern. Insert a piece of cardboard or brown paper folded into several layers inside the T-shirt directly under the place where the design will be applied. This will protect the other side of the T-shirt from the heated pattern.

      Position the drawing. Lay the transfer paper face down on the fabric. Place the design on the fabric exactly where you want the image to be.

      Iron the workpiece. Stroke differently than usual. To you not use an ironing board to iron the paper. The instructions for use of thermal transfer paper specifically mention the use of a hard surface because it retains heat. Ironing boards generally don't hold heat as well, and the paper needs to be hot enough to transfer well.

      Heat the pattern evenly with an iron. Make large circular motions with the iron over the paper. Start at the edges of the workpiece and gradually move towards the center. Apply pressure with the iron in sequence and iron for approximately 3-4 minutes. Move the iron constantly to avoid burning the fabric.

      • Before you finish ironing and move on to the next step, check to see if the edges are stuck to the fabric. If the design does not stick completely, continue ironing, pressing harder on the edges of the paper blank. The pressure must be even.

      ADVICE OF THE SPECIALIST

      Designer and stylist Oh Joy!

      Joy Cho - Founder and creative director design studio Oh Joy!, which she created over 10 years ago. Her design style is characterized by bright colors and incorporating unusual details into everyday life. He is the author of three books and advises creative companies around the world.

      Designer and stylist Oh Joy!

      Hold the iron over the pattern instead of constantly moving it around. Iron-on stickers require high temperatures, so moving the iron quickly can affect the final result. Set the iron to the correct temperature and hold it in place for as long as possible.

      Wait for the drawing to cool down. Turn off the iron at the end of the process and let the pattern cool for a few minutes. If you start removing the backing while the image is still hot, there is a high chance that it will move or be damaged.

      Gently remove the paper from the surface of the fabric. Start with one of the corners of the paper.

Screen printing and screen printing

The industry standard for printing on T-shirts and textiles in general. If you want to get a decent result (full color for example), then you need to invest heavily in both equipment and training. Very advantageous for medium and large runs from 100 pcs. to infinity.

Special printers

Now there are special printers for printing on fabric on the market. In principle, a rather promising direction, the only thing that stops is the price of a printer from 9,000 euros. Although there are exceptions here, it is still a rather expensive technique, which is interesting for large volumes of short runs.

Thermal transfer

Thermal transfer is the transfer of an image to various surfaces under the influence of temperature and pressure. Thermal transfer implies that you have a thermal press. The price of a thermal press ranges from 15,000 to 50,000 rubles, depending on the manufacturer (Chinese noname or a well-known American company) and the type of press - rotary or folding.
If you are planning to seriously engage in thermal transfer, then you need a press, if it is still a hobby or a test of the pen, then an iron will do.

Thermal transfer happens:

— Laser

— Stencil

- With film

- Inkjet

jet transfer

It means printing on inkjet printers. Moreover, if this is a household inkjet printer with conventional ink, then printing is done on special paper, which has a coating into which ink is embedded, then the paper, if necessary, is cut along the contour of the pattern, applied to the fabric with the image down and ironed. There is even paper for dark fabrics.

The advantages of this method include availability and low cost. All other indicators are solid flaws. The image is unstable, the colors quickly fade and wash out. To the touch, the pattern is rough and "rubber".

Sublimation (the second way to print with an inkjet printer)

Sublimation is the process of the transition of a substance from a solid state to a gaseous state, bypassing the liquid phase. There are various sublimation inks that are poured into an inkjet printer in CISS or refillable cartridges, and the printer must be of the EPSON brand due to the design of its print heads.

After that, a mirror image is printed on paper, dried and with the help of a press - an iron here is unlikely to help transferred to an object with a polymer (synthetics) content of more than 70%. The paper can be ordinary, but when transferring about 30% of the ink will not transfer, and the image will turn out dull, it is best to take special sublimation paper or, in extreme cases, any matte photo paper.

As for sublimation printing on T-shirts, you don’t even have to try to transfer sublimation to cotton fabric - even if it does, it won’t stick.
For natural fabrics, as well as for dark fabrics, there are special films that you first weld onto the fabric, as if getting a substrate, and then sublimate it.

This transfer method is perhaps the most resistant to washing. Advantages - high image stability, relative cheapness of the "start". Disadvantages - you need a separate printer, the impossibility of printing on dark fabrics without the use of films, you need a heat press, insufficient resistance to light.
Scope - production of flags, sportswear male and female. Production of metal plates (special metal, recommended for indoor use), plates (special plate, a special press is needed) and mugs (a special coated mug is needed, a mug press).

Transfer from laser printer

Has a lot of advantages. For laser transfer, you need a color laser printer (black and white is unlikely to work, due to the high temperature of the oven) and special transfer paper.

Papers are usually divided by brand of printer and by purpose.

Paper for light fabrics - suitable for light cotton and synthetic fabrics, the latter is better to hold on to. The image is printed "in a mirror".

Dark fabric paper - the image is printed directly, after which the paper is divided into 2 parts - the substrate, which is thrown away and a thin white film with a printed image, and then welded in a press or iron.

Substrate for dark fabric - here the situation is similar to sublimation - first we transfer to a special substrate, and then transfer everything together to the fabric. The backing has an interesting velvet finish, but feels rougher to the touch. Also suitable for sublimation.

Transfer Paper hard surface– an amazing possibility of laser transfer – image transfer to ceramics, wood, metal, glass, plastic, etc. Moreover, these materials can be without special coatings, however, to some extent to the detriment of image stability.
Here you definitely need a press and a special mat, which is placed on top and ensures uniform crimping of the product. By the way, ritual ovals are often made on the monuments in this way, but the durability of the image is about a year in the sun.

Very interesting paper "cold decal" - before there were such decals that fell into the water and then transferred, say, to the refrigerator? Here, it's almost the same, only printed on a laser printer! As you can see, you don't need a press.
So many people transfer pictures to candles, plates, mugs and any other items. Paper is available for both light and dark surfaces.
If you need to achieve image stability, then bake the product in the oven - 15 minutes at 180C.

The advantages of transferring from a laser printer: firstly, there are a lot of options, secondly, we use a “regular” color laser printer on which you can earn good money on operational printing, and thirdly, you can almost always get by with an iron at the initial stage.

And of course, the availability of ready-made media - mouse pads, puzzles, watches and more. Disadvantages - we get a souvenir item, which is still not intended for long-term use.

For the image transferred to a light fabric, about 40 hand washes at 40C are declared. For dark fabrics, durability is higher, but paper is noticeably more expensive. For example, an A4 sheet for a light fabric costs about 18 rubles, and for a dark one the same format is already more than 100 rubles. "cold decal", regardless of the color of the substrate - about 80 rubles. for a similar list.
With all this, profitability remains very good, the main thing is to correctly set up the process.

Screen Transfer

The image is printed with the same screen process, with the same inks, but in mirror order and on special paper. When necessary, transferred to the fabric.
It seems that everything is simple, but what do we get - since we print on paper and not on fabric, we can use cheap manual one-color machines, even home-made ones. In case of marriage during printing, we lose only paper (about 1 euro per sheet 70x100 cm), and not fabric.


We can print "in reserve" and transfer if necessary.
We can finally print cool creative pictures and then sell them, or vice versa, buy ready-made ones and only deal with transferring (there are a lot of examples of such a business, from clothing manufacturers, especially for children, to salons for transferring images to a T-shirt of the client’s choice).
Image durability with this transfer method is identical to direct screen printing!

Films

Everything is simple here - we have a film with an adhesive layer, which is melted in the press and glued to the fabric.
If done correctly and selected correct option films, the bond is extremely durable, you can boil, dry clean, rub and wrinkle. Films can be welded on top of each other, of different colors, obtaining simple color images.
Films are smooth or velvet (flock).

The color range can be quite extensive, including fluorescent colors, metallics and reflective films.
Often the film is divided into ordinary and more expensive, for fabrics with water-repellent impregnation (umbrellas, raincoats, bags, etc.)